


I’ve been rigging characters and working as a technical animator in the video game industry for 20 years. At least on three occasions, I’ve been asked to create a rigging framework for different studios. Sometimes, though, when you enter a studio, you’ve only got a few weeks to get started. And so there’s really not enough time to create a whole rigging framework or rigging tool set in that instance. And so I think it’s an OK thing to rely on existing tools in order to get the job done. And one of my favorite tools for rigging when in a pinch is mGear.
mGear is open source, which means you get all the code un-compiled. So you can add your own modules, edit modules, and really edit the code in any way you need in order to serve the project that you’re working on. So today, I wanted to just take a look at mGear and help you get started real quick… Because when I first opened it, I found that it can be a little confusing.
mGear works in Maya: So for those of you trying to learn Maya rigging or Maya animation, this might be a good place for you to start to get some ideas. Or if you just want to quickly rig up your own characters because you’re an animator, then mGear might be the choice for you.
You can download mGear right here: This is the github page for mGear.
When you download mGear, you’re just going to get a little package. It’s going to have a drag and drop installer: You can go ahead and put that, drag that installer right into Maya. And it’ll install everything into your default Modules folder. If you’re not familiar with your Modules folder, that’s usually under your Username>Documents>Maya>Modules.
Modules is a default place for Maya to look for tool sets. You can override this behavior using your environment variable by declaring the Maya module path. As you’ve seen, I’ve done right here in order to add my own custom tool set, which also includes mGear. If you have any troubles getting this installed, just send me a message, and I’ll see if I can help you out.
So once that’s working, there’s a couple things you need to do. And one of those is just going to be making sure that your plugins for mGear are installed.
You can do that by going to (in the top context bar of Maya) Windows, Settings and Preferences, and Plugin Manager. And when you open this up, there’s just two plugins that you’re going to need. And it’s worth noting that if you want to share your mGear rig with someone, you don’t really need them to install mGear, although I do recommend it because it comes with a lot of great tools to help with animation!
You just need to make sure that they have at least the Mgear Solvers plugin. The Weight Driver Plugin is useful if you’re going to use their deformers, but not really necessary.
So for this, I decided to take this little model I made in Nomad Sculpt on my iPad. Looks like Gudetama! And I’m going to show you a few different ways we can rig this up. I’ll also be trying to post these videos in sections as shorts and on TikTok. Otherwise, I’m trying to go as fast as I can. So there’s a couple ways you can get started.
You can build this thing entirely from individual modules: These are just Python scripts that have instructions for one part of the body, like an arm or a chain or a leg.

Another option is that if you go into mGear, you can actually bring in an entire guide template sample. Now, I know Gudetama looks like an egg, but he’s still kind of a biped, so we might be able to get away with using a premade biped rig. If you’re going to be bringing this into Unreal Engine, then they’ve already got some templates here that are super useful to get that started. So we have, like, the mannequin template with the Y up. And if I go ahead and click this, it’s going to build that template.
Once this rig is done, I will be posting it here absolutely for free, obviously, because I can’t sell Gudetama – but Gumroad and Twitch are other great ways to show support. You can find a lot of resources in the blog here if you’re into VTubing, or Unreal Engine, or just really anything related to bringing characters to life on your screen.

So you can see, once I press that, I get this cool biped template.
This is what I consider the layout. These little objects here (the colorful points shown on the biped- hips, wrists, etc) you can move around to place them to fit your character. And then once we’re all done (placing the points to match things like knee joints, etc), we can go ahead and build that.
But there’s a few details I should point out to get you started quickly with mGear. OK, I went ahead and sized my guy up here because he’s a little big: Now, this is tricky- the character is laying down horizontally, and mind you, it might be overkill because there’s quite a lot (of bones and controls etc) here. So, I’ll show you how to remove some of this stuff and get this working for a unique character like Gudetama.

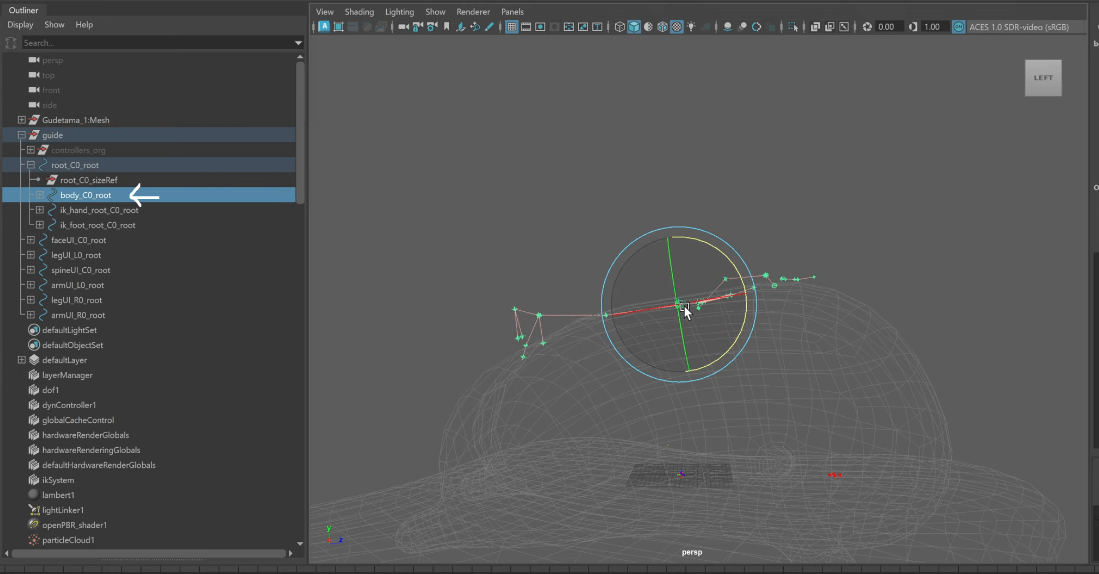
So the first thing I might do is just scale this whole entire thing down. You can do that by grabbing the guide right here (shown as a yellow block, the image below has an arrow highlighting it)
That’s the root of the entire guide. And just go ahead and scale it:

Pretty much everything in here can be scaled, moved, rotated. I do have some recommendations when it gets to like fingers and stuff that you don’t necessarily move these, but you kind of like zero out the rotations if you want the fingers to be straight, and rely mostly on rotations for fingers or you might get some weird behavior.
The other thing to keep in mind is mGear has these blades and this is going to kind of indicate the plane on which this limb is going to be built. So when we’re talking about IK, we consider that the wrist rotation is going to be based around how this plane is oriented, so that’s something you also want to keep in mind.

Right off the bat, I can say that we’re probably not going to need fingers, we’re probably not going to need clavicles, but we can leave them in if we wanted a little more flexibility in that motion. So it’s okay to just go ahead and delete these.
Now, honestly, what I do to get started is I delete pretty much everything on the right side of the body of the character. We can get rid of all these limbs, because (by doing this method) we can try to place them symmetrically. There’s really nothing built in to handle symmetrically-placing these things, but you can duplicate them symmetrically, which means that once you finish up the left side, you can just move everything over to the right.
Maybe somebody knows better than I do, but that’s the way I’ve been handling it.
So next thing I’m going to do is grab the Body. And that’s kind of the root of the pelvis and the spine and all that stuff. And I’m just going to shove it down in here, just like that; but I’m going to think about where sort of my pelvis is on this character. And then put this in this mode (the model now shows as basic textured/shaded, Grif toggles some magic thing offscreen) and kind of look at the wireframe here. There we go. And you can see how I kind of split this right around this edge: That’s what I was imagining being the pelvis.

So if I get this aligned kind of in the center of that, we should be doing pretty good. Put this layer back into template mode so I can see my spine.
So! Some controls are the parent of others (7:02)
The video starts to explain bone relationships: Two bones form a relationship, called a tangent. So this is sort of an IK, FK spline. And these tangent positions are going to let you IK adjust the bend of the spine.

So what I’m thinking is to grab these and do something kind of like this, (he’s dragging and elongating the space between points)
Make sure that the top of the spine is going to align roughly with where the arms are. (So for Gudetama, the top of the spine was moved downward to account for the character’s tiny, stubby arms.) And I’m just going to run through real quick and lay out all these objects (positioning them on the character mesh) and then pop right back in to continue.
A quick note as I’m laying these out, again, I am trying to zero rotations. I’m trying to zero translations except for X. I don’t know if this is 100% necessary, but I’ve gotten better results this way than just like… grossly grabbing something and moving it. So zeroing rotations might just be something worthwhile as you’re building out your rig to consider.

Right, so I’ve got all these laid out like so. Laying out joints is an art form of its own. After 20 years, I’ve picked up what I think works and what doesn’t work, but it’s going to up to you to sort of figure out what works best for you! So I deleted the foot, I deleted the fingers, I deleted some of the stuff I don’t need.

These objects here, these are the UI. (8:38)
So this is basically where you’re going to find your settings for like your arm, your leg, your spine, and your head. You can place these wherever you want. In fact, you can parent them under your limbs.

So for instance, if you wanted the arm UI to follow the actual arm, that is something you could just grab this and drag it up (inside of the Outliner) and parent it. Or just select that, select your clavicle or whatever you want to attach it to and hit P and that’s going to parent it under there. Or you can leave them out in front here if that’s more your thing. You just want to see them visible in front of the character, that’s completely valid!
For instance, we have a head module: It’s going to have two neck joints and a head joint. If we select that module, we can hit settings here. We can see that it’s called Neck.
We can actually have it parent to a lower spine by clicking this parent joint index and picking the index of the spine joint you want it to follow. We can see here that host I was talking about, that’s your UI controller. So, if this is an IK-FK head module, you’ll be able to do your switching and everything from there.
You can also go in here and configure your joint names. So if you don’t like the way that mGear is naming your joints, right now it’s trying to use Unreal’s naming convention, which is generally pretty good for me. But if you create something like your own custom chain, you might want to go in there and specify what those names are supposed to be.
You can also say if this is a center module, left or right. If it’s left or right, you’ll be able to mirror it across the center of the character. And then if you come into here, well, you can also edit the default colors and stuff in here. You come into here, there’s more options like how soft is the sort of IK spline. You can say how far can it stretch? What’s the maximum squash? How many divisions are in here, right? You can even set your IK reference array or your head reference array. So both of those things are
going to have an IK handle and an IK control.
And these are the space switches you can add to it. You can even see in here a squash and stretch profile if you want to change sort of the curvature, how extremely the head squashes and stretches. So all this stuff is in here and it’s available for every module.
In this case, I’m not really going to change much of this as I think this is probably going to work okay for this demonstration. And then if you wanted to kind of define the default naming convention for your head and neck joints, you can go ahead and type something in here and then it’s just going to iterate over that like neck 01, neck 02. So I think default settings are pretty good here.
Another thing I want to point out is that if you select the guide itself, it also has settings, right? And it’s got a lot of good stuff in here and I think this goes unrecognized sometimes. So you can even, like if you’d saved your skinning, mGear has a skinning tool. Skinning weights, you can export a skin pack in binary or ASCII and have that auto-load when you rebuild your rig.
One of my favorite things is this: custom steps. So you can add pre-steps or
post-steps. So if there’s a lot of modifications you want to do to this rig after it’s built, you could script all that out in Python and save that as a file and then add a post-custom steps right here and that will run after the rig is done building. You also got naming rules if you want to change kind of the conventions of this stuff, left, right, and center. You see LRC, joint naming, lowercase L, lowercase R. So these are all things that you can edit before building the rig.
But I think I’m pretty happy with just the defaults in this case. So the next thing I want to do is, since I went ahead and I deleted the right limbs, I can grab like the left
arm and I can say duplicate symmetrically, bam. And it’s just gonna swing it over to the other side, do the same thing here, bam.
And there you go. You pretty much have your entire layout object ready to go. Now, in my case, maybe I have this yoke here, there’s joints I wanted to add outside of there. I could make a whole separate rig with a whole separate guide or I could attach to the root of this character some joints that I could use to deform this. In my case, I’m probably gonna try to do something a little dynamic if I were to pursue this down the road. So that’s not really necessary.
You will see though that mGear also has a lot of stuff for handling dynamics, and springs, and all kinds of stuff. So really get in here and explore these menus. I will probably come back with future videos to cover some of this stuff, however.
So stay tuned for that.
Okay, another thing you can do is you can build each module individually. And the mGear website recommends this. If you’re trying something new or you’re just not sure, like for instance, how this leg is going to be oriented, then you can build that by itself. Like in my case here, I can see, oh, maybe this is a little too straight and my IK is gonna be a little wonky. So I can try building that out and just see. And you can see, yeah, my pole vector kind of flipped over here. A lot of times that can be because your chain is not straight, or it could be that it’s just like too straight in this plane. And so it doesn’t know exactly where to place the IK.
That’s not a problem though. If you don’t like it, I can go up to here, shifter, game tools, delete rig, keep joints. If you wanna keep the joints, you see here, it did keep the joints. I can delete those if I don’t wanna use them. So one thing I can do to help make sure this leg is straight is select, for instance, the knee and actually we’re gonna delete this whole module.
We’re gonna move over to (the knee). I can grab this knee and you see here, translate X, Y, and Z. X is the kind of downward plane here. So if I zero out Y and Z, that’ll help me make sure that this thing is a hundred percent straight. (Grif starts to select each bone and repeat this process to clean things up).
So I get more of a bend in the knee here. Let’s try that again. Yeah, and we get a pole vector that’s much more aligned with what we actually want.
Okay, so if we’re happy with the whole thing, we just go all the way up, grab the top guide and get rid of this thigh joint real quick, and then build from selected. Give that a little bit of time and bam, you got a rig. Pretty cool.
If we hide our guide here, we can go ahead and start manipulating these things and we’ll see that we get all the rig behavior we desired.
Yeah, (with mGear) it’s all here. You know, you got your roots, you got your COG, you got everything you could possibly need for this character ready to go. So in the next step, we do some skinning and we’ll fix up some things here.
You see like these are IK joints that you would use in Unreal if you’re using weapons or something and you want to use Unreal’s IK system. So those are things, generally I take these and I parent them to my wrists. I just do a parent constraint and that way, no matter where I end up moving those wrists, they will stay there and so they’ll just build correctly. You can also see, I forgot to mirror my leg over, but that’s all good.
So in the next part of this video series, I will continue on. I’ll show you how I skin things. After years and years of skinning things, I think I have a pretty good system that will get you there quickly. I know a lot of people struggle with that. So hopefully I can give you some tips and tricks that will get you there faster.
All right, thanks for joining me and be sure to check me out, Griffin Moore, on Instagram, TikTok, YouTube, and even on Twitch if you want to see me do work like this live. We are currently working on a video game in Unreal Engine and I’m using mGear to rig a lot of those characters. So if you’re interested in any of those aspects of video game production, be sure to stop by.
I’m streaming most mornings and we’ll catch you in the next video.